 Incident View - Incident Tab
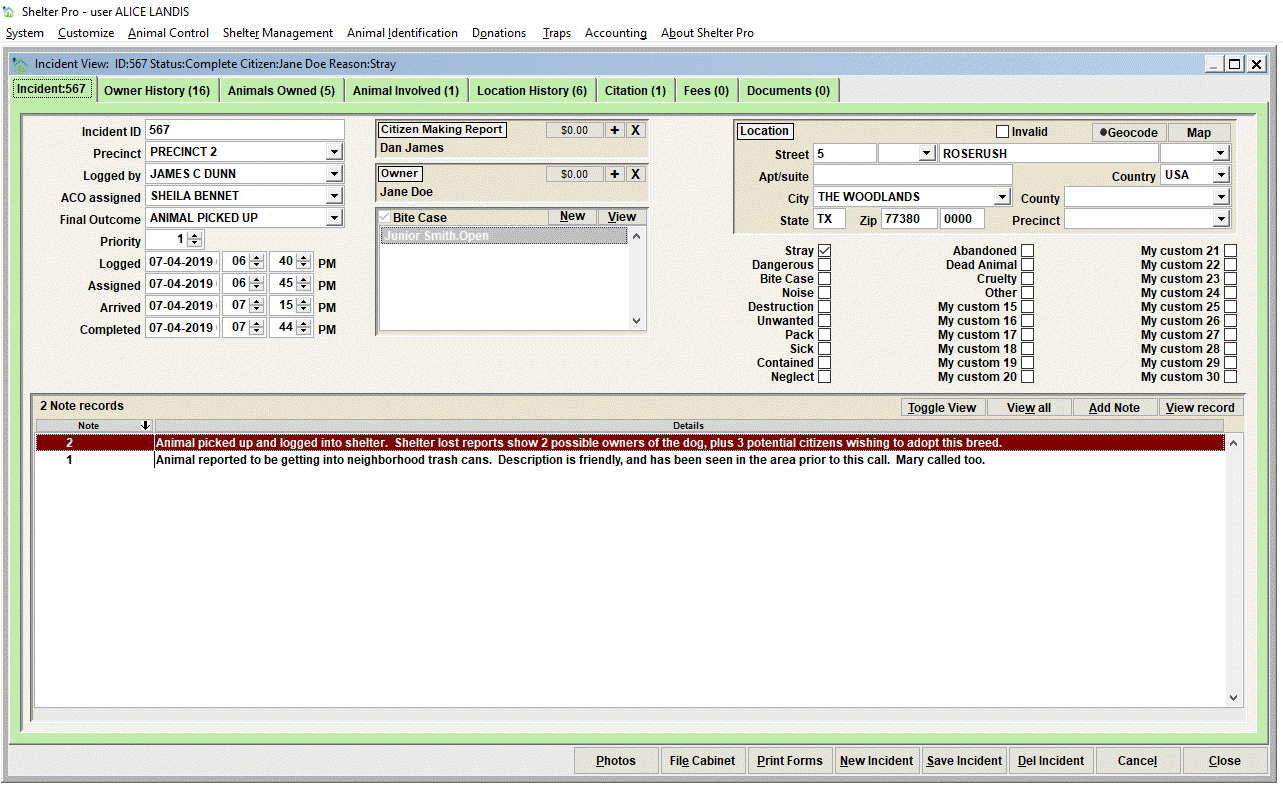
The Incident View is used to work with an individual incident record.
Notice the File Cabinet, Print Forms, New, etc. buttons...
For a quick rundown of the buttons on typical event view windows, see Buttons - Commands and Navigation
The Title Bar

For an Incident, the title bar will show the highest level of overview. The title bar content will stay the same no matter which tab (Incident, Owner History, Animals Owned, etc.) is being viewed.
Data elements with Incident records
The first tab shows the primary data related to an Incident. Notice how our example shows 'Incident: 567' in the tab name. The 567 is the tracking number.
Incident ID
Each incident should have an Incident ID which is a tracking identifier for each incident. Typically this is a unique numeric value. Each incident may be automatically assigned an Incident ID depending on how your Shelter Pro has been setup. If the ID is not automatically assigned, the ID can be manually entered. If automatic Incident ID assignment is being used, a Unique ID will show in the Incident ID field when the New button is clicked to initiate a new incident. This ID can be later used to locate and view Incidents using the Incident File Cabinet.
Precinct
The precinct values are used to specify the geography an incident will be associated with and reported under for monthly/annual reporting. The precinct may or may not be required depending on your organization's settings. Also note that the term 'Precinct' may not be used by your department as this term can be modified. It might be another term such as 'Jurisdiction', 'Municipality', 'City', etc depending on your department's particular terminology.
Logged by
This value will typically be the staff member who initiated the incident. This is often a 'dispatcher' or other staff member who receives call from the public requesting support from animal services. When the New button is clicked, this value will be automatically set to the currently logged in user. Note that when a new incident is initiated the incident's status will be automatically set to 'Unassigned'.
ACO assigned
This value will be the ACO (Animal Control Officer) who is assigned to work on a particular incident. When the value is set, the incident's status will automatically be set to 'Assigned'.
Final Outcome
This value is typically set by the ACO when the work on an incident is completed (or when the incident will be placed in a particular 'pending' state). When the value is set, the incident's status will automatically be set to 'Complete' There is one exception to this - if the selected value contains the phrase 'PENDING' in the beginning characters, the incident's status will be set to 'Pending'.
Priority
Optionally, an incident's priority can be auto-set when an incident reason(s) is selected. If being automatically set and multiple reasons are selected, the reason with the highest priority will be used. Note that the priority can also be manually set or overridden as appropriate.
Logged
This value represents the origination time stamp of an incident. It will be automatically be set when the New button is clicked. The value can be altered if needed.
Assigned
This value represents the time stamp when an ACO is selected for the incident in the 'ACO assigned' box. The value can be altered if needed.
Arrived
This value represents the time stamp when an ACO arrives at the location. This value is automatically set when a 'Final Outcome' selection of 'PENDING AT LOCATION' is selected. The value can be altered if needed.
Completed
This value represents the time stamp when an ACO finalizes (or closes) the incident. This value is automatically set when a 'Final Outcome' value is selected and the value does not contain 'PENDING' in the beginning value. The value can be altered if needed.
Citizen Making Report
This should be linked to the person database 'Person' who initiated the Incident. Another common term for this is the 'complainant'. The element is optional as it is common to have an incident where the CMR cannot be determined.
Owner
This should be linked to the person database 'Person' who is the pet owner (if and when known). The element is optional as it is common to have an incident where the owner cannot be determined. But when known this value should be set so that a citizen's history will include the incident in their history.
Bite Case check box
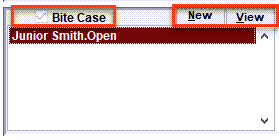
This should be checked when the incident involves a bite case and one or more bite case records will be added to the incident. Note that a new bite record will be attached to the incident when the 'New' button to the right of the Bite Case check box is clicked.
Location
This is where the address (reported location) should be entered. This will typically be the address where the ACO is dispatched to. The address can be geocoded to verify the existence of the address and self-correct the address values such as the city/state/postal, or spelling of the various values. The Map button will load the address to Google maps in a web browser so that a visual representation of the address can be seen, and driving directions can be initiated.
Reason codes
At least one Reason is required for an incident to be saved. There are up to 30 reason codes which can be specified for an incident. The values are fully customizable so they are adapted to your organization's terminology. Therefore the values on your Shelter Pro will likely vary from the sample screen above.
Notes

Notes are optional. The are used to provide deeper details about the particular record entered on the database. With notes you'll find there are varying note types which are specific to any particular event type.
For an incident some common note types would include 'Originating Report', 'ACO Report', 'Dispatch', 'Owner Statement', 'Witness Statement'. There may be additional note types defined on your Shelter Pro as note types can be extended using Shelter Pro's Customize features. This list can be modified via the customizable dropdown list NOTE_TYPE_INCIDENT.
Click on the Add Note button to add a new note, or View Note to open, review, edit an existing note. The View All will present all notes combined in chronological order for ease reading the full narrative on one screen. The Toggle View button will cause the content in the list to be changed to a different display setting.
For an overview of notes in Shelter Pro, click Notes and Narratives
Photos
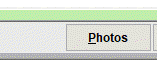
Notice the 'Photos' button toward the bottom of the screen. Photos (particularly evidence photos) can be linked via the Photos button. Note that these photos are not visible to the public (unlike photos that are shown on Kennel Cards and websites). With an incident, any photos taken by the ACO can be retained and used if the incident would later become a law enforcement/prosecution event. Note that photos (and other image types) can also be added under the 'Documents' tab.
For a discussion on linking photos to records click Linking Photos.
Status
The current status of each incident is determined automatically as the incident progresses from origination to completion. In the screen sample above, the status is shown in the title bar (note the status value shown being 'Status.Complete'.
The following status values are used:
- Unassigned - An incident which has not been assigned to an ACO.
- Assigned - An ACO has been assigned but the final outcome is not yet known.
- Complete - The final outcome from the ACO is known. The status is set to complete when the Final Outcome is selected, and the Final Outcome does not begin with the word 'Pending'.
- Pending - The status is set to Pending when a Final Outcome is selected, and Final Outcome value begins with the word 'Pending'. Pending can be used for Incident follow-ups such as compliance confirmations.
Next Topic
Note: Before going to the next topic notice that JANE DOE has been established as the pet owner in our sample above. This is relevant to the next two topics.
Incident View - Owner History
Comment or report problem with topic